Oscilloscopes
In this section we will try to give you a brief introduction into how the modern oscilloscope works and its basic controls. It is our intention to help you to have trust in this universal diagnostic tool. This introduction can in no way claim to be complete with regards to the electronic details of such tool, the aim is only to inform you of those things which are of importance for practical operation and use. Therefore many things are simplified in order to facilitate understanding of the basic functions.
- What is a oscilloscope: The oscilloscope is an electronic device with a screen, which is used to measure voltage against time. With its very fast measuring capabilities it can detect very short ( in time) and intermittent voltage signals and “freeze” them on the screen before they disappear. As they say “picture speaks a thousand words”, the oscilloscope paints a picture for us, on the screen, representing voltage versus time. Understanding those “pictures” or as we call them waveforms, is of utmost importance as to understanding the processes that have created them.
- The Scope screen: The oscilloscope screen has gone through some degree of “evolution” as the old screens were cathode-ray tubes and the modern screens can be anything from LCD screens, picture tubes (as used in TV’s and PC screens) or even plasma screens. There is a certain degree of difference between those and the way they represent a waveform. Due to the nature of LCD and PC displays the signal representation appears to be somewhat not as smooth as with normal tube. This is what we call “digitizing”. As you probably know, the PC screen is organized in rows and columns of little squire dots called - pixels. The very text you are reading now is in fact “made” of series of pixels organized in such a way as to represent letters. If you magnify those letters you’ll see the “painted” squire dots (pixels) next to each other. Most scopes today use this form of representing the waveforms as it is a small trade-off against the ability to capture, store, roll-back, expand, and even save the waveforms. So if you are used to see waveforms on your scope and move to one of another type you may find the same waveform somewhat strange. Never the less, little practice and basic understanding is all you need to quickly get used to the new one.
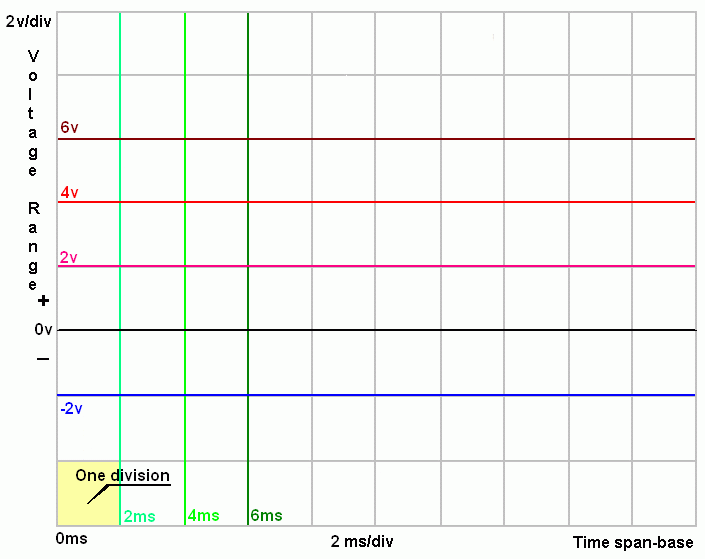
- Painting a picture: In order for us to understand the waveforms we see on the scope screen we need to know how are they painted on it. As we have said before, the scope represents the signal in to directions. Voltage value is represented vertically and the time taken – horizontally. Therefore the screen is divided in to a grid of squires called divisions vertically and horizontally. Vertically - voltage in volts, milivolts, kilovolts and so on, and horizontally – time in seconds, milliseconds, microseconds and so on. Each direction of divisions can be set to represent different values. So you can have 5v/div ( 5 volts per division ) representing voltage value of 5v if you have pattern that reaches to the top of the division, and 1s/div ( 1 second per division ) if the signal has lasted for 1sec. the pattern will reach the end of the division. The signal is painted pixel by pixel as it goes and any change in vertical direction represents the signal voltage value, and the time it took is represented horizontally.
- The Laboratory Scope: This is where the scopes were only used in the beginning, in the laboratories. Hence the name. The old scopes had cathode-ray tubes and limited capabilities of “conditioning” of the measured signal. If a signal had only occurred once and it did not repeat for long time, one have to stare at the screen for a long time in order not to miss it. Now that is painful and time consuming. With the advance of electronics and computers however, the modern lab scopes are much more sophisticated as they have much better capabilities of capturing the signal and displaying it on the screen.
- The Automotive Oscilloscope: This scope is essentially an ordinary scope, but with added capabilities and specific signal pick-ups as to make operating with it and using it to diagnose today’s vehicles faster and easier. One can still use an “ordinary” scope or a lab scope for such work, but setting time-base and triggers can be some times tedious and you’ll need those “special” signal pick-ups in order not to damage the scope inputs. So get yourself the right tool for the job.
- Basic Scope Controls: The two most important controls in the oscilloscope are the controls for change of time-base (horizontally) and change of voltage range ( vertically). Setting up those two properly, makes the difference between seeing a waveform and blank screen! While doing automotive diagnostics, we usually know (more or less) what is the voltage of the signal we want measure, setting the time-base ( time/div ) can be more difficult in order to “capture” the waveform we need. Good place to start is in the middle of the time-base range and then once you see a waveform appearing on screen, change the controls accordingly to get a good practical view of the measured signal. For most purposes setting the time-base to 20ms/div ( 20 milliseconds per division ) and 10v/div for the voltage range will get you a waveform and then the controls can be readjusted to suit the signal strength and time.
- Channels: We can ( for simplicity) look at the scope channels as its inputs. One channel scope can display only one waveform on the screen at a time because have one input. Now if we combine two channels with one screen, we’ll have two inputs and we’ll get two waveforms that we can compare on to the same screen. Most oscilloscopes have two channels, although 3, 4 and even more channels in one scope ( depending on the model ) can be found. Quite frankly the more the better as it gives the scope more versatility and comparing power.
- Triggering: Another control that we use in the oscilloscope is the ability to “start measuring when a particular event occurs”. This is called triggering. As the name suggest triggers are conditions which when met will trigger the scope to start the measurement. Now, this is very useful, if we want to separate particular event in time and also helps to get steady waveform that starts always from the same time when we measure repetitive events. Most events in the ignitions system are repetitive as we know already. Triggering can be done to positive and negative values, and to rising and falling values. Oscilloscopes usually have internal trigger ability as well as external.
1. Internal Trigger: Internal triggering is when we adjust the scope to trigger when the measured signal reaches certain value. i.e. 1v for instance. So when the signal is under 1v the screen will stay still (no measurement displayed) but as soon as it reaches the trigger point ( in this case 1v), the scope will start plotting the waveform on the screen. In other words it will show us what is happening with the signal after it reaches or exceeds the trigger level of 1v.. The internal triggering is only done for the scope channel we are working with.
2. External Trigger: External triggering is when we use external ( other to the one measured with the scope channel) signal. This external signal have to be monitored (measured) through another channel of the scope and when a trigger event occurs in that signal this event will trigger the first channel to start plotting the waveform of it’s own measured signal. We may or may not want to see the (external) triggering signal from the second channel. It is a matter of adjustment what you want to see on the screen.
3. Free Run (no trigger): This is when we leave the scope to plot the measured signal in a waveform and don’t interfere with how the waveform is displayed. This may be ok for some repetitive AC signals but for most DC signals and especially for ignition related signals we need to trigger as to see the events occurring from the very beginning. Otherwise you’ll get a waveform that starts anywhere on the time-base with no guarantee that it will start again there the next time it occurs.
To conclude: The Oscilloscope is the fastest, most versatile and the only tool that will let you see the signal and its variations under measurement with respect to the time it took. Those abilities make this tool, indispensable, if not the most important of the arsenal of automotive technician. Ever seen a doctor trying to predict the sex of a child before birth, without ultrasound machine. He may just get it right sometimes, but never 100%.
In addition to the ability to plot waveforms, most modern computer based oscilloscopes have many other useful features as calculating the minimum and maximum voltage peak of a the signal, conversions from frequency in to RPM, saving the waveforms and recording a "movie" of consecutive waveforms for a later review, etc, etc. Specialised Scopes as the ignition oscilloscope ( depending on the manufacturer and model ) can have other improvements as automatically setting the time/voltage bases for measurements of different signals i.e. "fuel injector" or "ignition primary" . This saves you time and ensures the waveform is always captured correctly.
