|
|
|
JBT CS
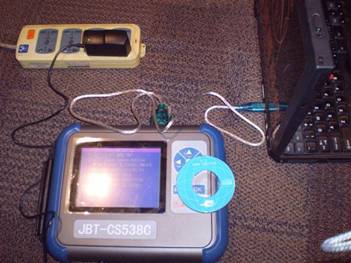
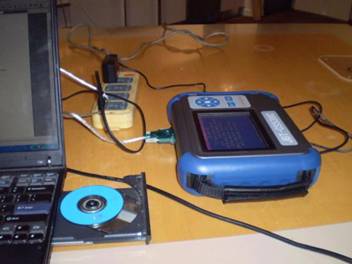
STEP 1 If your PC or Laptop have an 9 pin RS232 socket then you should use it for updating your scanner. Please use the 9 pin black color PC cable (RS232) to connect your Scanner to the PC. Power up the Scanner with the AC power cable. The 9 pin RS232 socket is found at the top part of the scanner. You should have a similar one on your PC. Most PC's will only have COM1 and/or COM2 of this type. If you are using this method of connection you can skip Step-2 below. The connecting picture is as below:
If you have a PC or a Laptop without the 9 pin socket, use the provided “USB to RS232 blue cable” to update your auto scanner. First: Check if your Cable is Marked 340 as the picture below shows. Make a note of that for later!
Next You have to Install the "Driver for USB to RS232 cable". This is found on the provided small blue CD. 1: Connect the USB end of the cable to your PC and let Windows find the correct driver on the CD.
After you insert the USB CD in the laptop, normally the CD driver will start to install automatically.
Otherwise you should browse the CD for the folder containing the correct driver.
If your Cable is marked 340 look for a folder named R340 and choose
HL-340.exe to install the Driver. If your Cable is different choose the correct driver from the CD. You could use any USB to RS232 cable providing you have the driver for it.
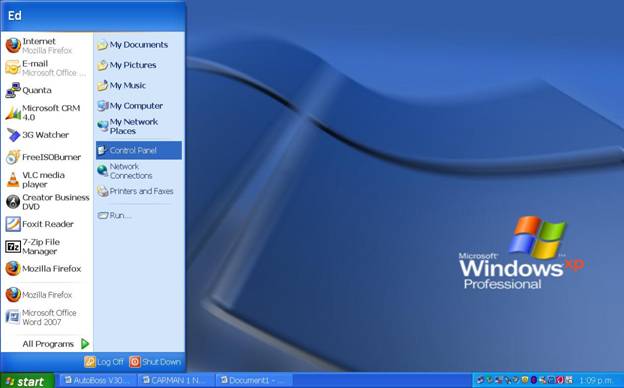
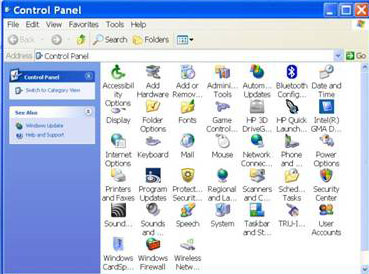
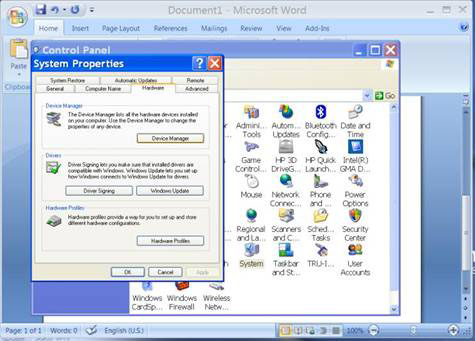
STEP 2 After you have installed the USB driver, you should check and change the COM port that the USB cable has assigned and using.. The method is as follow: ① Click Start and choose Control Panel
② When Control Panel opens choose System.
③ When System Properties opens click the Hardware button.
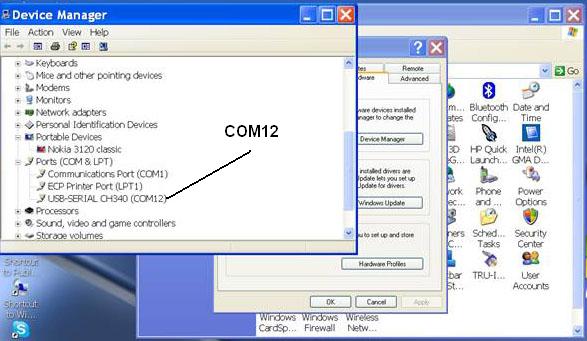
In Hardware, click Device Manager. In Device Manager window Scroll Down and find Ports (COM & LPT). Then check which COM number the USB adapter CH340 is using.
⑤ If your COM is not from COM1 to COM6, such as if it is COM12 as above, you should change it to COM1 or COM2 or COM3 or COM4,5,6
How to change the COM number: Make a note of the COM numbers in use at the moment. In the below picture it's COM1 and COM12 Right Click with the mouse on USB-SERIAL CH340. (COM12 in this instance) Click Properties from the menu.
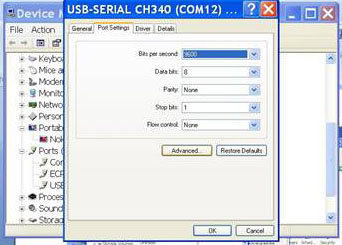
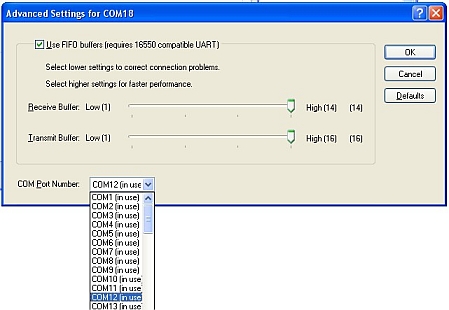
Click the Port Settings button on top of the window, then Advanced to change from COM12 to COM 2,3,4,5 or 6. Remember COM1 was in use so do not assign this number.
After you change to the right COM number, press OK. Then OK again and close the other open windows. NOTE: If Windows complains about the 'new' COM number being used by other device, say Yes/Ok to confirm the change. Windows automatically assigns 'new' COM port numbers to USB devices when they are plugged in. Make sure you use the same physical plug every time to connect the USB Cable or Windows will change the port number again.
STEP 3
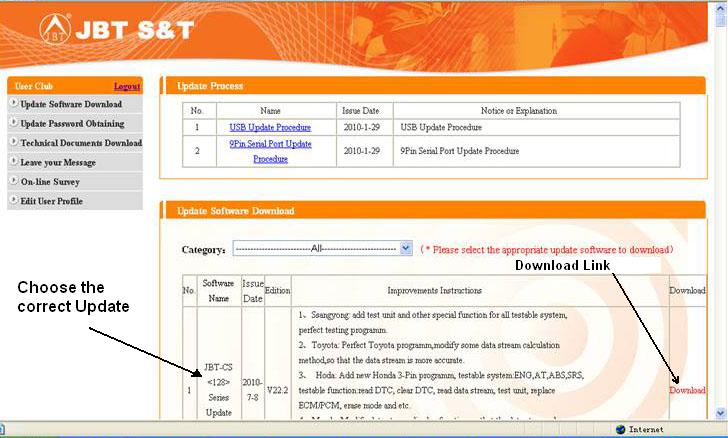
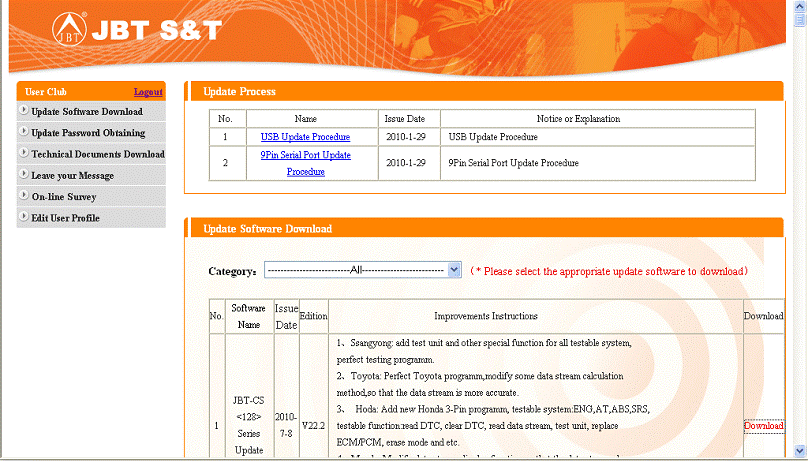
Enter our website: www.jinbenteng.com and navigate to the Download & Password section or click on the link below: You should Register first to get your password and update your details on the JBT website. If you run in to trouble email us at: support@crypton.co.za Once registered: Input your Scanner Serial Number and your Password to log in. The serial number should be on the back of the Scanner or it can be obtained from the first screen after the unit is switched on.
After logging in successfully, you will see the available Update Software. Latest Updates are on top of the list. Make sure you choose the correct update for you Scanner. i.e. <128> for CS538 series. Click on Download and save the file on to your PC.
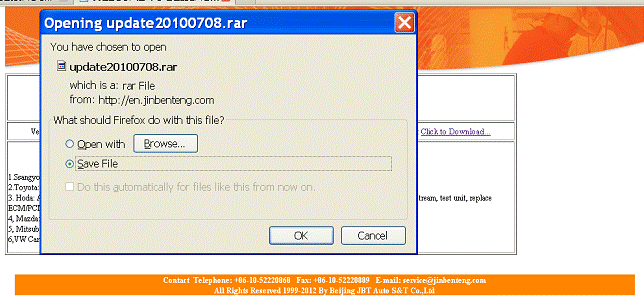
Click on Save File when prompted. This will save the update file in a folder of your choice. Once the file is saved / downloaded DO NOT EXIT the JBT web site or you will be required to log on again to complete the update.
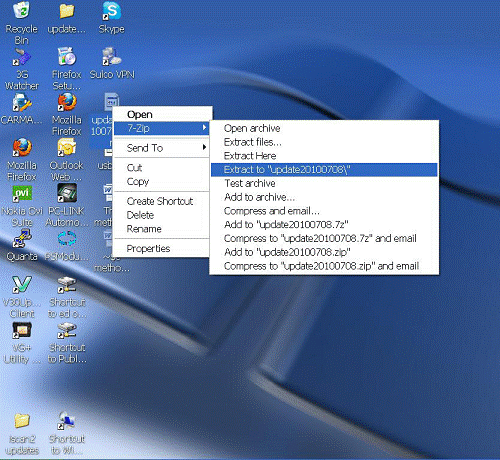
Find the downloaded update file and use the "Winrar" program to extract it, because it is compressed file. This is done to protect the Update from viruses etc. etc. If you do not have Winrar on your PC, you could search and download Winrar from the Internet or click here http://www.winrarzip.co.za/ to download it. Extract the update software file in to your C: Drive. (recomended)
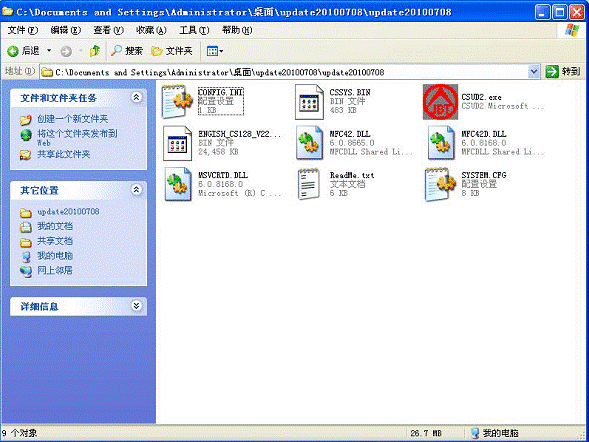
After extraction is done, open the folder named "Update........." which should be in you C drive. You will see 9 files in the folder.
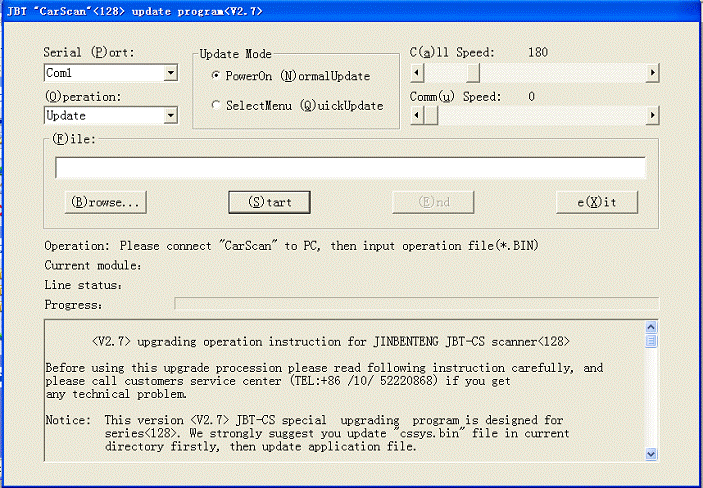
STEP 3a Click on the file called CSUD2.exe (it is the file with the JBT red icon logo) The Update Program will open as below:
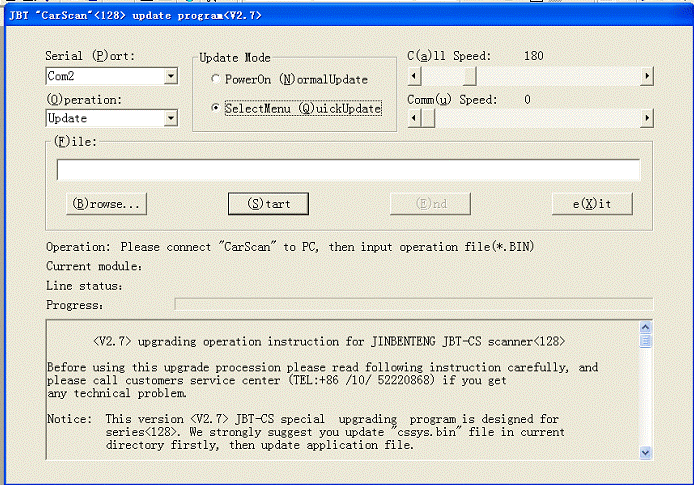
First choose the correct Serial COM (P)ort you have connected the Scanner to. COM2 in this case. Under Update Mode select (Q)uick Update. Leave the C(a)ll Speed and Comm(u) Speed untouched.
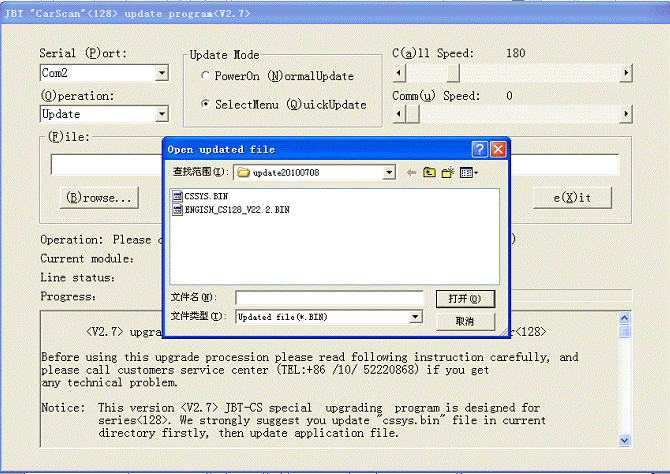
Then click the (B)rowse button and choose the CSSYS.bin file from the newly opened window. Click the (S)tart button and then follow the instructions beside Operation:
STEP 4 Turn on the Scanner, and scroll down to N: 7 QUICK UPDATE The program will ask you to Turn ON the scanner and choose Quick Update. Press OK button on the scanner. The Scanner Screen will change and the Update will begin. You can monitor the update status beside Progress: in the program. Once completed (up to 30min) the program will notify you with an Update OK screen. Note: If the update does not start: Turn the scanner Off and exit the Update program. Turn On the scanner (make sure it's connected to the COM port properly) and repeat from step 3a.
STEP 5 With the Update Program still open click on the (B)rowse button again and this time choose the file called ENGLISH_CS128_V22.2.bin
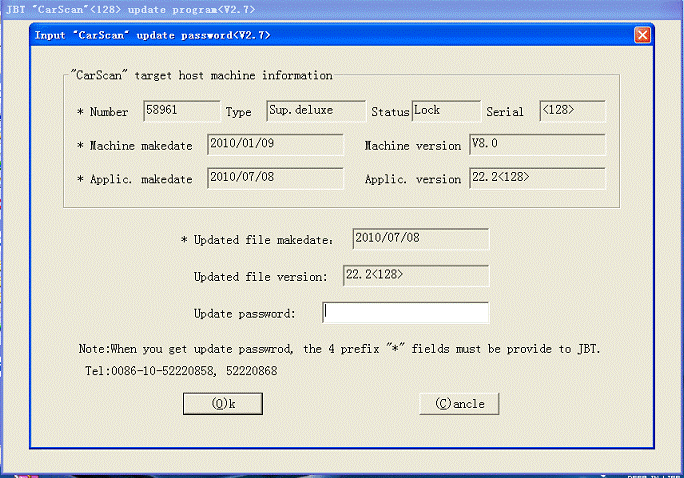
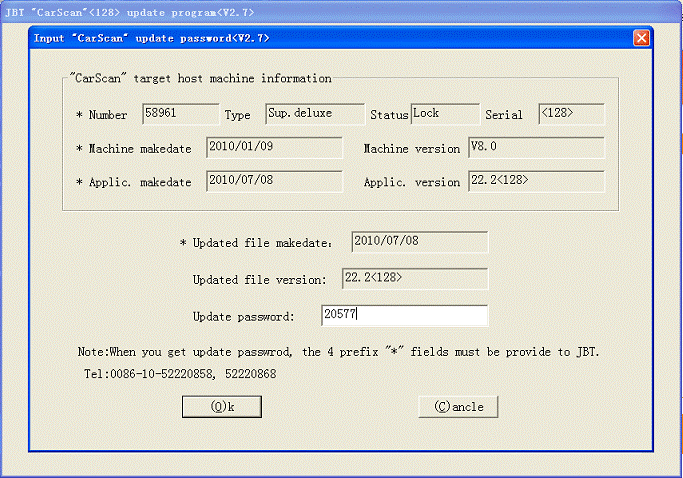
The program will open a new window that shows the Scanner *Number (serial number), *Machine make date, *Application make date and *Update file make date. You will need this information to obtain an Update Password from our web site.
STEP 6
Enter our website: www.jinbenteng.com and navigate to the Download & Password section or click on the link below: Input your Scanner Serial Number and your Password to log in. The serial number should be on the back of the Scanner.
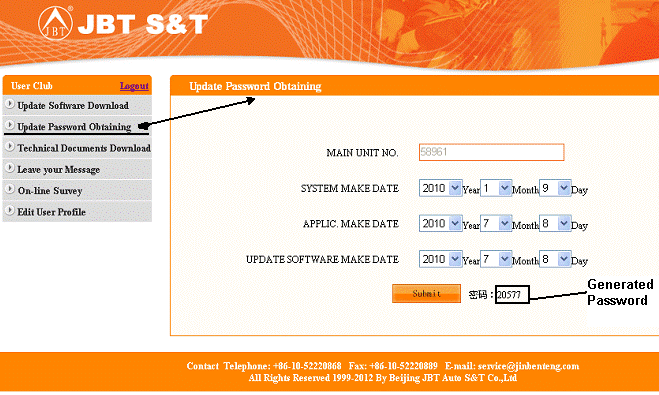
Note: If you haven't logged-off or exited the JBT web site during the previous steps, ignore the above. Once logged in the User Club choose Update Password Obtaining from the Menu on the left. (second from top)
A new window will open where you should input the values of: System make date (Machine make date), *Application make date and *Update file make date. Take those values from the Update program on your PC. (see below pictures)
After you input the numbers, click the SUBMIT button to generate the Password.
There is a minor bug on the web site presently which makes obtaining the correct password tricky. Click here to read how to work around the problem if you encounter it.
Type the Password into the Update Password field in the Update Program.
Click OK button and Press OK button on the scanner (with Quick Update chosen) or power it up to start the update automatically. If not, You may need to repeat STEP-4 above to get the Update going. Once completed, the program will notify you with an Update OK screen. Exit the Update program, Switch Off the Scanner and disconnect from the PC. The Update is now Done!
Please ensure stable power supply to the unit and your PC for the duration of the Update. Make sure the scanner's Printer is powered off during update. Do Not touch any button or any cable until the update is completed. This can take between 1 and 5 Hours depending on your PC settings, Update file size and the Update Mode you have chosen.
PowerOn (N)ormal Update - takes longer and requires you to switch On the unit when asked to do so. (Red squire power button) This mode literally programs the scanner from scratch. You may need to perform this if the scanner's power was interrupted during update.
If there is any interrupt during the update process, you should do the whole updating procedure again. Email support@crypton.co.za if you have problems updating or bring the scanner to us for software update.
|